Step-by-Step DNS records Configuration in Plesk: A Complete Guide
Table of Contents
Introduction
DNS records Managing is a crucial aspect of administering a website, as it dictates how web traffic is directed and how email services are handled. Plesk, a widely used web hosting control panel, simplifies the process of managing DNS records for your domain. Whether you need to add an A record to point your domain to an IP address, a CNAME record for domain aliases, or an MX record for mail server configuration, Plesk provides an intuitive interface to make these adjustments effortlessly. This guide will walk you through the steps to add various DNS records in Plesk, ensuring your domain settings are correctly configured.
Steps for adding a DNS Records in Plesk control panel.
Log into Plesk:
- Access your Plesk control panel using your username and password.

Select Your Domain
In the left-hand sidebar, go to Websites & Domains. Find the domain for which you want to add DNS records and click on it.

Access DNS Settings:
Under your domain, click on DNS Settings.

Add a New Record
Click on Add Record at the top of the DNS settings page.

Choose the Record Type
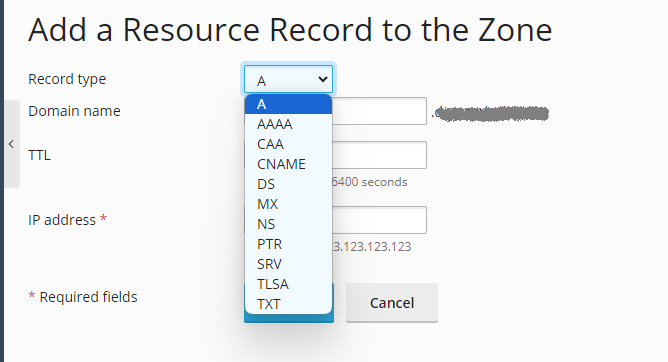
A new window will appear where you can select the type of DNS record you want to add (A, AAAA, CNAME, MX, TXT, etc.).

Enter the Record Details:
- Record type: Select the type of DNS record (e.g., A, CNAME, MX).
- Domain name: Enter the subdomain if needed (or leave it blank for the main domain).
- Record value: Depending on the type of record, enter the appropriate value (e.g., IP address for A record, canonical name for CNAME, mail server address for MX).
Save the Record
After entering the details, click OK or Save.

Apply Changes
Once you’ve added all your DNS records, click on Update or Apply to save the changes. Plesk will notify you if the DNS zone was updated successfully.
Example: Adding an A Record
Let’s say you want to add an A record for the subdomain blog.example.com pointing to the IP address 192.0.2.1.
- Click Add Record.
- Select A from the Record type dropdown.
- In the Domain name field, enter
blog(without the quotes). - In the IP address field, enter
192.0.2.1. - Click OK, then Update.
Example: Adding a CNAME Record
To add a CNAME record for the subdomain www.example.com pointing to example.com:
- Click Add Record.
- Select CNAME from the Record type dropdown.
- In the Domain name field, enter
www. - In the Canonical name field, enter
example.com. - Click OK, then Update.
Example: Adding an MX Record
To add an MX record for example.com pointing to mail.example.com with priority 10:
- Click Add Record.
- Select MX from the Record type dropdown.
- Leave the Domain name field blank (or enter
@if required by your setup). - In the Mail exchange server field, enter
mail.example.com. - In the Priority field, enter
10. - Click OK, then Update.
By following these steps, you can add various types of DNS records to your domain in Plesk. Ensure that the DNS changes propagate properly, which might take some time depending on the TTL settings and your DNS provider.
Conclusion
Adding and managing DNS records in Plesk is a straightforward process that can significantly impact your website’s functionality and accessibility. By following the steps outlined in this guide, you can easily add A, CNAME, and MX records, among others, ensuring that your domain points to the correct IP addresses, aliases are properly configured, and email services are correctly routed. Proper DNS management is essential for maintaining a reliable and efficient web presence, and Plesk’s user-friendly interface makes it accessible even to those with minimal technical expertise. Ensure your changes propagate correctly and monitor your domain to maintain optimal performance and connectivity.


